If you liked Symmetrical Origami and wanted to know how to make the 4 basic folds we used, here you go!:
For all folds, I used a 12" x 12" paper for the demonstration so that it was large enough for the students to see, follow and refer back to.
 A)
A)
I kept the folds in the photographs to kind of give you a preview of where the folds will be.
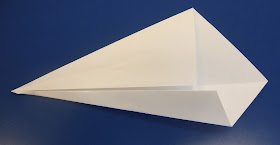
1. Fold square in half diagonally so that you have a triangle.

2. Open back up and use the fold as a guide line. Take the outside corners and place edge against the fold line.

3. Repeat on other side.

That's it! We called it a kite.
B)
1. Repeat 1-3 from letter A.
2. Take outside edges and fold once more towards center "fold guide."
3. Repeat on other side.

Easy peasy! We called this a skinny kite.
C)
1. Fold paper in half like a hot dog or hamburger.

2. Fold in half again to have one small square.

3. Open up once. The center fold will be your guide. Take corner and match edge to "fold guide."

4. Repeat on other side.

D) This one's the tricky one!
1. Fold square in half diagonally to make one large triangle.
2. Open and fold in half in the other diagonal direction. When you open your paper up, you should have a large X.

3. Two opposite triangles will need to be pinched in and tucked.

4. Squish flat.

5. Take one flap and fold down so that the edge is at a 90* angle.

6. Repeat on other side.

That's it! Those were the 4 folds we used, but feel free to use any simple fold you'd like to come up with! : - )
For all folds, I used a 12" x 12" paper for the demonstration so that it was large enough for the students to see, follow and refer back to.

I kept the folds in the photographs to kind of give you a preview of where the folds will be.
1. Fold square in half diagonally so that you have a triangle.

2. Open back up and use the fold as a guide line. Take the outside corners and place edge against the fold line.

3. Repeat on other side.

That's it! We called it a kite.
B)
1. Repeat 1-3 from letter A.
2. Take outside edges and fold once more towards center "fold guide."

3. Repeat on other side.

Easy peasy! We called this a skinny kite.
C)
1. Fold paper in half like a hot dog or hamburger.

2. Fold in half again to have one small square.

3. Open up once. The center fold will be your guide. Take corner and match edge to "fold guide."

4. Repeat on other side.

D) This one's the tricky one!
1. Fold square in half diagonally to make one large triangle.
2. Open and fold in half in the other diagonal direction. When you open your paper up, you should have a large X.

3. Two opposite triangles will need to be pinched in and tucked.

4. Squish flat.

5. Take one flap and fold down so that the edge is at a 90* angle.

6. Repeat on other side.

That's it! Those were the 4 folds we used, but feel free to use any simple fold you'd like to come up with! : - )
awesome! thanks for sharing the how to:) I'm doing collaborative origami snowflakes inspired by these this week:)
ReplyDeleteThis is really helpful
ReplyDeletehow do u do the tucking part i cant do it
ReplyDeletethe tucking prt is super ez
ReplyDeleteI kept the folds in the photographs to kind of give you a preview of where the folds will be. gul ahmed lawn collection 2016 with price , lawn collection with prices
ReplyDeleteok
ReplyDeleteThis is nice
ReplyDeleteHola
ReplyDeleteMe parece una falta de respeto que este en ingles 🤬
ReplyDelete¿Hola? ¿Esta en Inglés? ¡ESTO ES UNA MULTA DEL FBI!
ReplyDeleteun poco de respeto vale Marco cubo chaves
ReplyDeleteQue te pasa Urko Fernandéz?
ReplyDeletemarco
ReplyDeletehola que tal
ReplyDeleteHOLA SOY MUY TONTO 😄
ReplyDeleteSoy super.... dotado
ReplyDeleteHola
ReplyDeletehola
ReplyDeletewahttttttttttttttttttttttttt
ReplyDeletesoy L.M.L
ReplyDeletehola luis
DeleteWhat hapens bro?
ReplyDeleteI don't lern wahat do they doing
ReplyDeleteWhat hapens bro?
ReplyDeleteHola, creador baneame que soy muy tonto y no se leer 😄
ReplyDeleteHola, perdón por meterme con una persona con más coeficiente intelectual que yo, me voy a estudiar para mis 19 recuperaciones.
ReplyDelete